Monday, December 27, 2010

happy birthday (5 in 5 sketches class)

today's card was inspired by a class i took back in October. right before i got so crazy busy and had no time to craft at all i took an online class taught by Latrice Murphy called 5 sketches in 5 days. it was an great learning experience, and i still have the PDF's from the class becuase i knew when i signed up i didn't really have time but i would eventually come back to them. 

i was also a winner of one of the giveaways that Latrice had for the class, as you'll see in the video the designer paper i'm using is one of the beautiful papers i won (along with some ranger paint daubers, ribbon & fibers & some other scrap goodies :)


thanks for watching & be sure to check out Latrice's blog-she's super talented
vlog ya later!

Saturday, December 25, 2010

merry christmas!!!

Merry Christmas crafters!!!
just want to wish everyone a fun & safe holiday. enjoy it with family & friends.

my husband and i have a Christmas tradition (based on the fact that we have no patience) we open most of our gifts well before Christmas day. but we always save 1 gift to give each other on Christmas morning. (well i'll be honest, we made it to 8:30 last night-we're terrible i know-lol!)

so here's my Christmas day gift . . . a 36 set of Copic Markers!
 
i'm so EXCITED about & i can't wait to learn how to use them!
Merry Christmas
blog ya later!

Friday, December 24, 2010

we thank God for you card


Merry Christmas Eve!!! 
yesterday i really wanted to make a card, and i had really no idea what kind of card i wanted to make or what i wanted to do at all. the best thing to do in that situation is pick up your favorite things, tools/embellishments that you know you love, and you know you've used in a variety of ways and that way you'll be happy with the outcome. 
i picked basic grey's indian summer collection. if you've been reading my blog for a while, you know that when that paper came out i fell in love with it, it's still one of my fav's from BG. and i also picked HA's heart winged butterfly. 

so here's the video of what i came up with. i'm getting a little bit better with my video editing software (taking baby steps :)


thanks for watching
vlog ya later!

Thursday, December 23, 2010

blue moon scrapbooking haul

happy holidays scrapper!!!
i'm finally on winter break, and i'm SO happy. i have all the time i want to craft to my hearts content. today i want to share my recent purchase from blue moon scrapbooking. i LOVE this site. if you haven't checked it out you have to.


thanks for watching
vlog ya later :)

Wednesday, December 15, 2010

my grown up christmas list

it's that time of year again. time to pull out the christmas lights, decorate the tree, watch holiday movies and of course drop not so subtle hints to the hubby about all the cool scrap stuff i'd love to see under the tree on christmas morning. 
so what's on my scrap-christmas-wish list this year. . . 

tim holtz bracket sizzix on the edge die
tim holtz distress ink (this is one of my fav. inks and i want to keep adding to my color collection)

lately i've been watching a lot of mini albums and altered projects on youtube, and i've been so inspired by two scrappers in particular mybutterflykisses12 & livelovescrap. i definitly want to get into mini albums next year and that thought inspired the next few items on my list


i'm looking forward to the new year and all the new products that will come out. 
blog ya later. (:

Tuesday, December 14, 2010

merry little christmas card

i'm back! and with a video tutorial. . .ok, it's not the best editing in the world. i'm willing to admit that. but, i spent all weekend trying to learn how to use my new video editing software (it was a long and complicated process for someone with no video editing experience ever), so even though this video is totally amateur, i'm kind of proud of myself. and it's only going to get better from here going forward. i promise
let the vlogging being :)


thanks for watching, 
vlog ya later

Monday, December 6, 2010

i started today with the best of intentions. . .

. . .really i did. i got a new video camera and video editing software (Christmas gifts-yes i know it's not Christmas yet, my husband and I have no patience, and we figured that since we don't have kids it wasn't such a big deal. when we have kids we'll force ourselves to actually wait for the 25th of december before we start opening our presents). but anyway back to the video part.

i filmed myself making a card!!! yes, you heard it here first, i'm on my way to vlogging (video blogging). but i'm a total amateur and i have SO much to learn about filming and editing, and so my good intentions have met a few road bumps. i doubt highly i'll have this posted by tonight, so the plan is to get it posted before the week is out and that way i won't feel so bad about myself.

i appreciate your patience.
vlog ya later (hopefully sooner than later :)

Thursday, November 18, 2010

an update. . .

hi!
ok, so i haven't blogged in what feels like forever. but i'll be back soon i promise.

in life things come up, and October was a crazy busy month. but i've got some excited things in the works, and as soon as i can find my camera (we just moved and now i can't find it-driving me NUTS) i'll be back up and running with new cards, AND some scrapbooking -yes i finally started scrapbooking again, and some great giveaways.

and i'm working on redoing my scrap-wall. so i'll probably do a before and after post on that. since we moved i have a much bigger wall (oh the possibilities :)

also i'm hoping to get a video camera for christmas, and hopefully by next year i'll be video-blogging or vlogging (as i'm sure i'll want to call it) the camera on my wish list. . .the sony bloggie! is that not the coolest camera you've ever seen? love that built in usb port!

so that's what's going on and what's coming up.

by the way if you're looking for christmas card inspiration! check out Jennifer McGuires thinking inking Holiday class and Kristina Werners 25 days of Christmas!

blog ya later!

Sunday, September 19, 2010

ivarai's scrappy blog card challenge 9-13


today's card was made for ivarai's card challenge. when i start a sketch challenge the first thing i do is draw the sketch in my sketchbook, that way i have it sitting in front of my at my desk. it also helps get the sketch in my head and helps me start formulating ideas. 


the next thing i did was decide my theme, i decided on a baby card, and picked my fiskars sweet pea baby stamp set. i decided i wanted my sentiment to be sweet pea, and immediately thought of cosmo cricket's garden variety papers-a perfect match! for my cardbase i used kraft cardstock cut to a standard sized card 5 1/4 x 4 1/4.


i cut my papers out to create the three square panels for the base part of the sketch then started adding my layers. i used my fiskars scalloped sentiment punch to make a scallop from black cardstock. (it's so funny as i'm writing this i'm realizing just how much fiskars product i used on this card) then used my fiskars paper trimmer to cut the cardstock so that i had a really thin scallop edge. 

next i began distressing my designer paper. i used rangers distress ink in peeled paint, and also went around the edges lightly using vintage photo just to give it definition. 


then i began working on the sentiment. i cut a 3 inch cylinder shape using my cricut and the george and basic shapes cartridge. then i stamped my sentiment on the cylinder shape using peeled paint distress ink, stamped it on white paper to cut out the body of the little pea-baby, then i stamped his little face on kraft cardstock to give him a skin tone face, and then i stamped the little baby hat on the cosmo cricket paper and cut it out. 

because i was doing a baby card, buttons felt like the perfect embellishment. the three green buttons i purchased at wal-mart. i used white ribbon, tied it in a bow, and used a mini glue dot to attach it to the button. then adhered all three buttons using craft glue dots. 

because i'd distressed all of the papers and used such dark colors on a baby card i decided to do some faux stitching with my white gel pen to brighten the card up. 

as a final touch i added recollections black pearls. 
i love this sketch, i'm definitely going to use it again, and i had a great time playing along with this challenge. if you want to play along all the info can be found HERE!

thanks for looking!
blog ya later

Monday, September 13, 2010

boo treat bag


halloween can be such a fun holiday for kids. nothing better than trick or treating-getting dress up and of course getting free candy! 

and so for my first assignment as a glue dots dottie (a halloween theme project) i decided to make a monster themed treat bag. which would be perfect as a halloween party favor or for kids to take to school and pass out to their classmates. 


i started with a small treat sak, i purchased it from target for $1. the treat sak is 6 1/2 in tall x 3 in wide. i used my t-square ruler and bone folder to score the top of the bag at 1 1/4 inch. i purchased the monster stickers at michael's arts and crafts stores. but if you're looking for similar monsters you can purchase them HERE


then i got started on the decorative part of the bag. i cut black cardstock to 5 x 3 inches, and cut purple cardstock 4 3/4 x 2 3/4 inches. 


i cut a strip of designer paper 1 1/4 x 3 inches, and matted on black cardstock 1 1/2 x 3 inches. for the sentiment i used maya road chipboard letters. looking for similar chipboard letters, you can purchase them HERE


i used colorbox chalk ink in lime green to color the raw chipboard letters. i inked the letters on top of rangers kraft mat, which it perfect to ink on, because it wipes clean so easily. 


next, i cut a 2 1/2 inch circle on my cricut, using the george and basic shapes cartridge, with black cardstock. i adhered it to the purple cardstock, with about a quarter of the circle hanging off, and trimmed that part off with tim holtz tonix scissors. 


then i began adhering my layers together. i used glue dots memory book dot n go adhesive. to attach the chipboard letters i used mini glue dots


then i added the little monster sticker to the simi circle, and used a white gel pen to add faux stitching detail. 

next i wanted to add star shaped brads as embellishments. i cut off the prongs on the back of the brads, and used glue dots to adhere them. then i adhered all the layered pieces to the treat bag. 


at this point i added the candy, because i was getting ready to close the bag.

i folded the top of the bag over, and marked with a pencil where i wanted the ribbon to go through, and used my we r memory keepers crop-a-dile to punch two holes, and string the ribbon through, and tied it in a bow. 


as a finishing touch i added rangers purple stickles to give the stars a purple glittery shine. 


I wrote this blog post while participating on the Glue Dots design team
thanks so much for looking
blog ya later!

Sunday, September 12, 2010

i'm a dottie!!! whoo hooo!!!

on april 9th- just my second post on this blog- i posted about the dt call for glue dots. short, and to the point it simply said. . .


exciting news! glue dots is having a design team call. dare i apply? i think i will. if you're interested here's all the information you need to apply HERE.
wish me luck! :)


and then three days ago, i got the announcement i'd been waiting to see since april. I was surprised, i was thrilled. i was . . . a little unsure if it was me. see the list said shawnte park, missing the "s" at the end of my last name. and i had the scary thought that maybe that wasn't me. but then i thought, it can't be possible that someone else could have a name that close to mine. (but i emailed glue dots to double check before i let myself get too excited about it).
once i got email confirmation i shouted my joy from the mountain top- more commonly known as twitter. :) LOL!

i'm looking forward to getting to know all the wonderful ladies on both the dottess and dottie teams.

if you're on twitter let me know so i can follow you. you can find me on twitter at @mylo143, also please leave a link to your blog in the comments. i'd love to check it out.

 so that's my exciting news.
blog ya later!

Friday, September 10, 2010

woof!


if you've been reading by blog for a while you know that i started as a scrapbooker and evolved into a cardmaker. as a scrapbooker i considered myself a scrapper, but cardmakers call themselves stampers. and this is the first card i've made that made me truly feel like a stamper. i didn't use any patterned paper on this card it was all about the stamping, which before felt foreign and weird, but this card felt completely natural. now that i've made this wonderful leap in the craft world i think i'll call myself a scramper, LOL! maybe not :) anyway, enough of my random humor, on to the card. 


banner cards are huge right now. they're EVERYWHERE. and they're adorable. and i purchased this new stamp set and my first thought was hmmm. . . .how cute would it be to make a doggie banner with bones instead of flags strung between the fire hydrants. so that's where the idea for this card came from.

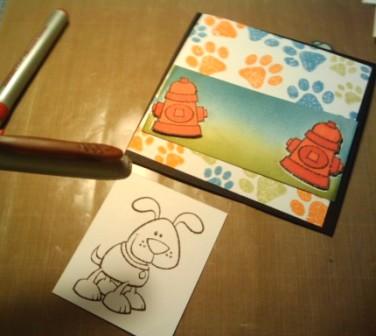
the other thing that different for me with this card. it's a square card! 4 1/4 x 4 1/4. this is a really fun size to play with, you have an even smaller space, so if having too much space is a little intimidating for you, i highly recommend this size, it's like a mini card, very non-intimidating.the inks are rangers distress inks in shabby shutters, spiced marmalade, and broken china. 


that white cardstock is cut to 4 x 4, and i used the doggie paw print and stamped my background. making a diagonal line with each ink color. until i had the background covered. 


then i cut a strip of cardstock that was 2 x 4 (which i later cut down to 1 3/4 x 4 because i mounted it on black cardstock). i stamped the fire hydrants on each end. then stamped them again on another piece of cardstock and cut them out. i used tombo mono removable tape runner to adhere the hydrants to the cardstock to create a mask. 


i used inkessentials blending tool, and rangers shabby shutters, and broken china distress ink to create grass, and the sky behind the hydrants, then removed the masks. 


i stamped the hydrants again, and colored them with regular markers. (i can't wait till i get copic markers. they're so amazing and they blend beautifully and make your projects look so cool. but i don't have any yet, so i used regular bic markers that i got on sale at staples :)


then i stamped and colored the doggie. i was going to use the poodle at first, but she felt a little fancy, and i wanted this card to be more playful. i colored him with a brown bic marker, just adding some brown spots, and i made his collar orange and red (to match the hydrants.) and gave him a pink nose. 


then came the part that i made much more complicated than it needed to be. ok, a normal banner card just has the string running behind the pennants.clean. simple. easy. i don't know what i was thinking, i decided to wrap the string around the bones. which was so hard to do. 
problem: the string kept slipping and moving, and i couldn't get the spacing right, and i couldn't lay it out and see exactly how i wanted it before i had it adhered down, it was cardmaking chaos. solution: glue dots!
i attached each bone to the string using mini glue dots, had to figure out how far apart i wanted them placed, and secure them to the card with dimensional adhesive.
it's really sad, but i felt so acomplished after i finished that doggie banner. LOL!

so i had all the parts and i layed it out on the black card base, and realized it needed a little something more. 

i used the speech bubble from a hero arts christmas stamp set. i believe it's jolly christmas. stamped with walnut stain distress ink. then stamped the word woof in spiced marmalade distress ink. and cut it out. glued it all together, and i was done. 

thanks so much for looking, if you have any questions leave them in the comments.
blog ya later!