Showing posts with label card. Show all posts

Sunday, October 30, 2011

give thanks


hello crafters!
i hope everyone is having a great weekend. in the crazy busy schedule that is my life now that i'm a full time working adult who decided she should go back to school. i've managed to carve out a little time for the hobby i love and my poor neglected blog. (which got a facelift today!!-i love the new look, hope you do too!)

there were two inspirations behind todays cards. recently kristina werner did a youtube series called friday focus, and the focus was patterned paper. so i decided to challenge myself to make a card using all pattern paper-no cardstock!
which can be a little tricky because you can end up having a visually overwhelming -hot mess- of a card. but if you follow the rules of mixing patterned paper, which kristina explains so well-check out the link. you get a really great card!


the second inspiration came when i looked at the colors of patterned paper that i choose (all from my minds eye's stella and rose mabel 6x6 paper pad). they made me think of thanksgiving, which is a holiday that's coming up in the states.

so let's get close up and see what i did. . .

  • i had some fun rounding the corners of the card with my new making memories corner chomper with the stub corner. 
  • the paper bird is a recollections die cut i purchased at michaels earlier this summer for only $0.99! 
  • i added some twine tied into a bow with a mini glue dot. 
  • i created the rosette flower with patterned paper
  • and the rhinestone flourish are by recollections as well. 
  • the scallop border was created using fiskars scalloped sentiment punch
  • the stickers used to spell out the word "give" are making memories (super teenie tiny-perfect for cards)
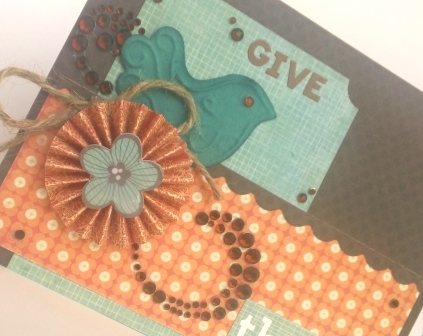


  • i embossed using versamark ink, a hero arts stamp (from the bird, tree and messages stamp set-an oldie but a goodie!) and white american crafts zing embossing powder
thanks for stopping by the blog. if you have any questions please leave them in the comments. and please feel free to comment-they make my day a little (ok-a LOT) happier!
blog ya later
avgscrapgirl!

Monday, July 11, 2011

one stamp two ways part 1


hello crafters
i've been working on a lot of altered projects lately, it felt good to sit down at my craft desk and make a couple of cards!
i purchased this inkadinkado individual clear stamp at my local big lots, and i was so excited to get started using it.


i used white embossing powder on recollection white cardstock. then used my ink essentials blending tool, and distress ink in wild honey, spiced marmalade, barn door, broken china, & stormy sky.
after coloring the flowers i cut them out. and layered them on the cardfront.
i added designer paper from stella and rose's mabel 6x6 paper pad. and punched a scalloped border, using fiskars scalloped sentiment punch.
i stamped the sentiment using a hero arts stamp anytime messages stamp set and momento tuxedo black ink.

i layered the orange flower using a glue dots craft dot. 
then finished the card by adding rhinestones to the center of the flower


thanks for stopping by
blog ya later,
avgscrapgirl

Friday, May 13, 2011

bridal shower card


one of my best friends will be getting married this june, and i created this card for her bridal shower is this weekend.


i used k&co's julienne collection, which is so lovely and just perfect for a wedding themed card.


supplies used:

k&company's julienne 6x6 specialty paper

cristal sticker pearls

spellbinders nestabilities label's one

recollections dimensional sticker (wedding dress & veil)

Saturday, April 30, 2011

a new arrival


hello crafters!
today i have a little bit of a throwback post. i'm going to do a photo tutorial, i was going to film myself making the card but i didn't have time to edit, so i decided to take some pics.
i purchased this inkadinkadoo stamp set at michael's. they were having an amazing clearance sale on stamp sets, and i couldn't pass this up at that great price!
the stamp set was the motivation for the theme of the card.
for the cardbase, i used kraft cardstock cut to a standard sized card, and i ran the white cardstock through my big shot with an embossing folder. 

i started by stamping the image on white cardstock, and cosmo cricket's garden variety designer paper, using colorbox chalk ink in black.

next i cut out the baby blanket from the designer paper.
then i paper pieced the blanket to the bunny rabbit, and colored the rabbit in with a pale yellow copic marker. and cut our the rabbit, leaving a thin white boarder, so that the stamped image would stand out from the print background.
i used my coluzzle circle cutter to cut out the circle piece that i wanted to use behind my stamped image.
next i punched a scalloped border strip from the same cosmo cricket paper pack, using martha stewarts border punch. i'm sorry i don't remember the name of this punch, if anyone knows please leave it in the comments, i would really appreciate it :)
then i began assembling my pieces on the card, i adhered the embossed white cardstock, scalloped border, circle piece, and wide yellow ribbon that i tied in a bow.
then i added some swirling pearl accents
lastly i stamped the sentiment on white cardstock, and cut it down to a small rectangle, and adhered right unter the bow, then added yellow queen and company rhinestones.
here's a close up shot of the card.

thanks for looking, enjoy the rest of your weekend :)
blog ya later!
shawnte, the avgscrapgirl

Monday, April 25, 2011

cardstock and creative problem solving


hello crafters!
i hope that you all had a blessed Easter weekend. i had a wonderful time with my family, and today i decided to get back to crafting.
for this card i challenged myself to use only cardstock (no designer paper).
the card base is recollections black cardstock cut and folded to a standard sized card. i layered white cardstock, and used a scalloped martha stewart punch (sorry i don't know the name of the punch).
the ribbon is just regular ribbon that i purchased from wal-mart.
i started to stamp a hero arts "thank you sentiment, stacked multiple times, but it came crooked and uneven, and looked horrible.
i had a big problem that i needed to fix. . .
so i took more cardstock and covered the bad stamping,then added another scalloped border strip across the top, and stamped the thank you sentiment using a technique tuesday stamp, which actually looked a lot better than on this card than the orignal stamp i'd planned to use. the font is fancier and better suited for this card.
i finished the card by adding a recollections flower and faux stiching with a white gel pen.
what i learned from my mistake?
sometimes fixing a mistake can lead to a better design that what you originally had in mind.


don't forget that i my current giveaway ends this Saturday! for more info check out this blog post!

happy scrapping!
blog ya later,
shawnte, the avgscrapgirl!

Saturday, April 16, 2011

thank you card


it's been so long since i've been at my craft desk, and when i sat down to make this card, i just wanted to do something simple to get myself back in the card-making-groove.


i used k&co's ancestry paper pack, cricut george & basic shapes cartridge for the flower, a sandy lion fabric brad, a creative memories heart shaped punch, ranger glossy accents, recollections butterfly, and fiskars scalloped sentiment punch.

i really like the way it came out, thanks for looking
blog ya later,
shawnte the avgscrapgirl

Sunday, January 9, 2011

bee mine


i usually laugh at store decorations that seem to jump from one holiday to the next, but here i am, coming fresh of of christmas cards, and making valentines day cards, with no regard for the full month of january in between the two. oh well-at least i had fun making it LOL! :)


check out the video below on how i made this card, i'm really sorry because my camera ran out of memory or something the end of the video is cut off. but you really only miss seeing me add the two small butterfly's in the corner.


thanks for watching,
vlog ya later!

Saturday, January 8, 2011

trendspotting: rosette flowers


last summer it was all about banners, they were on cards and layouts everywhere. the latest trend i've noticed: rosette flowers. you can buy them pre-made

american crafts has a cute set that's just perfect for valentines day. kristina werner's used these stickers in this weeks macm.

they're also fun and easy to make. plus when you make you own embellishment you can customize it so that it's perfect for your project.


i used a rosette flower on this valentines day card. i'll be posting a video tutorial soon showing how i made my rosette flower, and used it on another valentines day themed card.
there are some great tools that you can get to make creating a rosette flower easier. if you have a big shot, be sure to pick up tim holtz's die. check out his video on how to use it HERE.
if you don't have a big shot or the tim holtz die my tutorial will show you how to create it with your bone folder and your paper trimmer. 

hope everyone is having a crafty weekend!
blog ya later :)